Tutorial: how to reduce audio latency
Easy and smart ways to solve one of the most annoying computer audio problem.
While recording real instruments
Our solution to solve computer audio latency problems during real instruments recording.
During audio recordings
Our solution to resolve computer audio latency problems during audio recordings.
While recording MIDI instruments
Our solution to resolve computer audio latency during MIDI instruments recording.
How to solve computer audio latency problems for audio recordings
No more out of sync audio recordings.
Being out of time or out of tune are some of the worst things that you can do in music.
But, don’t worry: we’re here to help you out.
The principle: audio splitting
To completely and definitely solve computer audio latency problems during your audio recordings, you have to split your signal in two different ways: one to your audio card in order to record the signal, and the other one to your speakers to hear your signal with zero latency.
This system is called direct monitoring, and it completely zeroes audio latency.
Zero audio latency system with audio cards with direct monitoring option
Do you remember our tutorial on how to choose the right audio card, in which we advised to buy an audio card with direct monitoring option?
This is why.
If you have an audio card with direct monitoring, setting up a zero latency system will be extremely straighforward.
If your audio card doesn’t have a direct montoring feature, skip to the next paragraph: how to set up a zero latency recording rig with an audio card without direct monitoring feature.
Instrument: the instrument that you’re recording. A guitar, a microphone, a drum: doesn’t matter. And audio source.
Audio splitter: it’s an audio device that duplicates one signal. If you don’t have one, you can do the same with a mixer: just route a single channel through 2 different busses, or let your channel exit from both master outs.
Audio card in 1: you will use this channel to record, and not to listen what you’re playing.
Audio card in 2: use your direct monitoring option in this channel, and listen to what you’re playing.
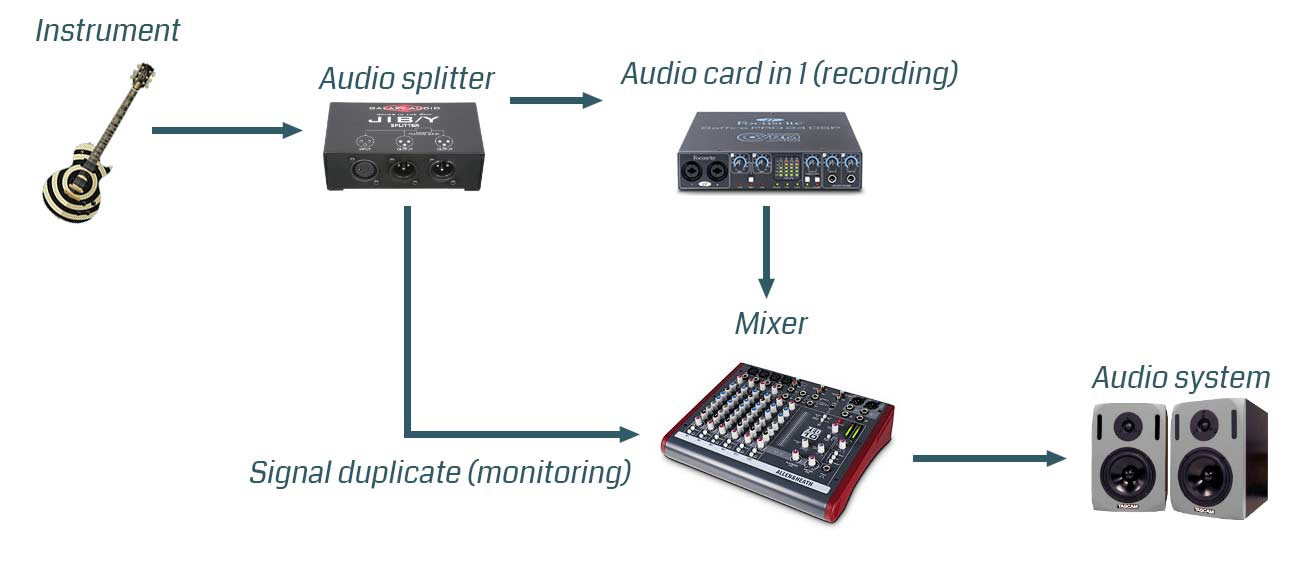
Audio system: send your whole mix to your audio system, and you’re ready to record without latency.
Zero audio latency system with audio cards without direct monitoring option
But, don’t worry: even if you don’t have an audio card with direct monitoring feature, we got you covered.
Instrument: the instrument that you’re recording. A guitar, a microphone, a drum: doesn’t matter. And audio source.
Audio splitter: it’s an audio device that duplicates one signal. If you don’t have one, you can do the same with a mixer: just route a single channel through 2 different busses, or let your channel exit from both master outs.
Audio card in 1: you will use this channel to record, and not to listen what you’re playing.
Signal duplicate: this line is a duplicate of your original audio signal, and you’ll use it to listen to what you’re playing.
Mixer: mix up your computer signal with your signal duplicate, and you will listen to what you’re playing without any latency.
How to solve computer audio latency problems for MIDI recordings
This will be kind of tricky.
Since your signal is just a MIDI control, that your computer will convert in an audio signal, you can’t deal with the situation like you would do with an audio signal.
So, we offer you two ways of optimize the audio latency of your MIDI recording.
1- DAW session optimization
A- Deactivate any VSTi or plug-in that you don’t need for your recording.
B- If you can’t deactivate them, make a temporary audio bounce down, put it into your project and deactivate them (if you have Cubase, just “freeze” your tracks).
C- Make a duplicate of your session without any plug-in or VST that you don’t need, and export your MIDI track in the main DAW session.
D- If you can, raise the sampling frequency: the more the frequency, the less the latency.
F- Lower your audio card buffer. We usually record between 256 and 64.
2- Audio placeholders
It’s the same principle of the audio splitting, but with in a more articulate variation: split your MIDI signal to your audio card and to an external MIDI sound module or keyboard with a sound that resembles the one on your VSTi.
Don’t worry if the sound it’s not the same: it’s just a placeholder! You’ll deal with the sound design after: now, it’s time to record it well.
Then, sum up your signals just like you would to for an audio signal (click here to know how).
Let us hear from you!
If you have found this post to be useful, share with us your experiences on your social networks!
Maybe you could also add a link of what you’ve created, and by using the hashtag #lmkmprod we’ll be able to find all of you.
We’re looking forward to hearing from you!


