Tag Archive for: tutorial

Tutorial: how to create a good reverb

First of all, to create a good reverb, we need to understand what it is composed of:

  • Phase 1: early reflections
  • Phase 2: late reflections

Early reflections are the most complex part of a reverb: they provide us specific information about room size and sound position

Unfortunately, they’re also the hardest thing to set up about a reverb.

As the name suggests, they’re the early reflections caused by reverberation. They’re extremely swift: usually, they happen within 100 milliseconds after the sound is generated.

Due to their swiftness, they’re going to be perceived as part of the sound itself.

Late reflections result from the gradual energy loss of sound waves, reflection after reflection

This part is due to reverberation weakening. They’re called “late reflections” because, unlike early ones, they’re perceived as disconnected from the initial sound.

Depending on the material of the location in which the reverberation occurs, late reflections are going to comprise different frequencies.

Location size influences late reflections duration: the greater its size, the longer the duration will be.

Usually, modern devices are able to create quite realistic late reflections.

Let’s now see how to properly set up a reverberation unit.

For convenience, we’re going to refer to the reverberation space as “room”: reverberation units use the same terminology.

Mind that reverb is one of the most complex features of a sound: make sure that you have a great listening system before starting to edit one.

How to properly set up early reflections

First of all, lower to zero the volume of late reflections.
(Warning: the cheapest reverberation devices don’t allow for this. In such a case, you’ll have to find a work around).

Changing the size of the room: the more you increase early reflections delay (in milliseconds), the bigger the room will seem. Increase or lower the delay until it feels just right.

Changing the sound position: in the most sophisticated reverbs, you’ll be able to set up different millisecond values per channel. The more you lower the delay of a channel with respect to another, the more the sound will seem to come from that direction.

Protip: many reverberation devices tend to create early reflections with a very low volume. Do keep this in mind, in the event that you aren’t able to properly hear them.

Make sure that your reverb is creating realistic early reflections: unfortunately, many reverberation devices aren’t able to do that.
If you feel like, despite carefully choosing the milliseconds of delay, your reverb doesn’t sound realistic, there’s nothing else to do but change your device.
(Or keep a mediocre one).

How to properly set up late reflections

Leaving early reflections at their normal volume, you have two features you can act upon:
Changing the consistency of room walls: the thicker the wall material, the more they will be able to reflect frequencies.
This feature is usually managed by a low-pass filter (LPF) and a high-pass filter (HPF).
The more you rise the LPF cutoff frequency, the more you will feel like being in a room with metallic walls.
The more you rise the HPF cutoff frequency, the more you will feel like being in a room that absorbs low frequencies (this case is quite peculiar. E.g., a room that’s undergone acoustic treatments).

Changing the size of the room: the longer the late reflection duration, the bigger the room will seem. Increase or lower the duration (in seconds) until it feels just right.

If you want to know the reason behind the realization of these tutorials, you’ll find it here:

Our first post.

Also, on our website you’ll be able to listen to the products of our expertise.

Let us hear from y!

If you have found this post to be useful, share with us your experiences on our socials!
Maybe you could also add a link of what you’ve created, and by using the hashtag #lmkmprod we’ll be able to find all of you.

We’re looking forward to hearing from you!


Tutorial: 9 steps to place well your studio monitors

10 minutes to properly place your studio monitors.

In this tutorial we’re going to give you 9 simple tips to accurately place your studio monitors.

This is a tutorial for near field monitors.

Premise: you’re going to need a 2 meters long rope/wire, a laser level and a microphone stand.

Any laser level will do the job: you can one for little money in any tool shop.

Like this one, for example.

www.bricoman.it

www.bricoman.it

  • Choose a room with the features listed below.

    The more of these features it has, the better your studio will be

    • Thick walls
    • Walls composed of dense material
    • Uneven walls (for example, natural stone ones)
    • No bare walls (wardrobes, bookshelves, armchairs, couches)
    • No bare corners (corners are, from an acoustic point of view, quite peculiar)
    • Far from bedrooms / highly populated areas
    • Far from noisy public transport systems (underground, tram, train, rocket launch base…)
    • No noisy neighbors
    • Dry
    • Not excessively high or low temperatures
  • Choose and place the workbench

    You should favour a workbench that’s solid and full (that is, without room for legs): they have a better acoustic output.

    Place its rear close to the widest wall, leaving 30-40 cm of empty space between the bench and the wall itself.

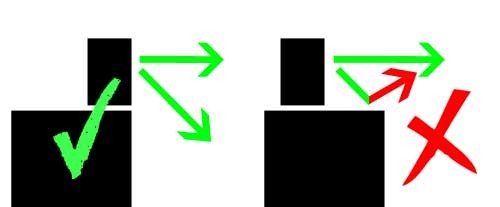
  • Place the monitors in line with the workbench edge

    Anything you put below the monitors is going to create reflections. And reflectioins alter the audio signal.

    Try to keep the space in front of the monitors as clear as possible, but there’s no need to overdo: a keyboard, for example, is not going to cause any harm.

    And yes, you got it right: placing the speakers behind a huge mixer with a gazillion of faders is not a good idea.

    Try to put a notebook below your chin while you’re speaking, and listen to the difference. And remember that the human voice has much less frequencies than an audio signal.

    Giusta posizione casse bordo.

    Correct monitor position.

  • Place the monitors so that their tweeters are at the same height as your ears.

    High pitched sounds are extremely directional: to hear them well you need to point them exactly at your ear height.

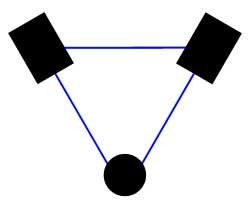
  • Set up the triangle

    Place the speakers so that they create, more or less, an equilateral triangle with your head as one of the vertexes.

    A rapid method is to use your arms as guides: open them out so as to form an equilateral triangle, having the speakers in front of the palm of your hands.

  • Refining the triangle

    Vertically extend the microphone stand, and place it where your head is going to be.

    Take the wire, measure the distance between the stand and the tweeter and, holding your finger on the rope marking the measured distance, use it to equate the distance between these points:

    • Tweeter 1 – Tweeter 2
    • Tweeter 1 – Stand
    • Tweeter 2 – Stand

    This way, you will obtain a perfect equilateral triangle.

    Like the one in this picture.

    Monitor da studio posizionati correttamente.

    Properly placed studio monitors.

  • Laser pointing.

    Place the laser level upon the monitor, exactly above the tweeter, turn the speaker until the tweeter is aligned with the microphone stand.

    Of course, don’t move around neither the stand nor the monitors: turn the speakers so that their tweeters are pointing towards the stand.

  • Success.

    Pop a bottle of champagne, turn up the volume, and play Lateralus by Tool in your now perfectly positioned system.

At this point, your system is going to be flawlessly positioned.

In other tutorials we will explain how to acoustically prepare the room in which you placed your speakers and how to solve possible sound problems that may ruin the reliability of your audio monitors.

If you want to know why this tutorial was made, you’ll find out more in this post:

Our first post.

And you got our entire website to hear if we’re talking about something that we can do.

We want to hear about you!

If you found this post useful, please: share your experience with us on our social pages!
Maybe together with a link to what you’ve created, and using our official hashtag #lmkmprod to let us find you all.

We’re looking forward to hear about you!

8 rules to choose the right audio monitors

Smart tips to choose the right equipment for your passion.

Another crucial step when creating music in a professional manner is the purchase of a pair of studio monitors.

Unfortunately, studio monitors are quite a complex piece of equipment, and in most cases it won’t be possible to take advantage of all its potentiality.

This guide is just a basic tutorial on how to choose your first studio monitors: for the ultimate audio setup, it is necessary for sound professionals to step in, as well as a good amount of money to spend in acoustic treatments.

  • Near field? Mid field? Far field?

    Absolutely near field.
    Mid field and far field monitors are extremely expensive and, even when affortable, they’re pretty hard to use for a basic setup like a home/project studio.
    Moreover, if you ever have to deal with monitors of such quality, there will be other people to set them up for you.

  • Room size.

    The size of your room is going to be crucial for a good sound quality: the bigger the monitor, the larger the room should be, otherwise they will not operate properly.

    If your room size is higher than about 4x4x2.5 m, you’ll be able to afford 8” monitors. A room that’s 5x5x3 m in size is perfect for 8” monitors.

    If you’re unlucky and do not have access to such a big room, you should purchase 5” monitors.

    If the room is much bigger than 4x4x2.5 m, you may have reverb issues.

  • 5” vs 8”

    5” monitors are the most convenient ones, but they won’t allow you to work on low frequencies. They’re meant to be used along with a subwoofer.

    8” ones are more expensive, but with them you’ll be able to work on low frequencies as well. They also have a good quality / price ratio.

    If you’re seriously looking to work with sound and music, our suggestion is to buy an 8” monitor.

    A 5” monitor + subwoofer is going to be much more expensive than an 8” monitor alone, and it’s also going to be more difficult to setup.

  • Multiple listenings?

    Useless.
    If you own good monitors, all you have to do is filter the input signal with an equalizer: you’ll achieve the same frequency response of whatever loudspeaker you desire.

    A single pair of great studio monitors is the best choice.

  • Which brand?

    It’s not that important.
    Brand by itself is not going to give much information about the quality of your monitors.
    There are monitors made by unknown brands that sound extremely good, and popular brand ones that sound just… “meh”.

    Speaking of reliability: almost all current monitors are, if properly handled, extremely reliable.

    The real method to understand what the best monitor is, is described in the following step.

  • Frequency response

    A monitor frequency response indicates its audio quality.
    The flatter it is, the better your monitor will reproduce the sounds you’re transmitting to it.
    The choice, in this case, is fairly simple: compare the different frequency responses of the monitors you’re browsing, and pick one with the flattest curve.

    If you’re lucky enough to be able to check it, this is the fastest and most reliable way to verify the quality of a monitor.

    However, if this information is not available, in the following two steps we’ll suggest you other methods to test your new monitors.

  • Music test

    If you really want to put a system under pressure, the best way is to have it reproduce Metal or orchestral music.

    In fact, these kinds of music have large dynamic and timbric excursion (they range from silence to massive volumes, and their sounds are extremely colorful).

    Minimal music pieces such as Blues, Jazz or even solo instrument ones are inadvisable to test sound monitors.
    They’re never going to put enough pressure on the timbric capacity of your new monitors.
    Moreover, given their low timbre (they do not have particularly colorful sounds), they will make the system sound better than it really would.
    This is because, given their low timbric demand, they will (relatively speaking) deliver the whole musical message, instilling in you the emotions they are supposed to.

    Hence, it’s time to pull out Brahms and Periphery.
    Or even LMK solo record: https://open.spotify.com/album/3zoTvDRS0ANwoNp8AFn36d

  • For the brave ones: spectrometric analysis

    The best way to test by yourselves the quality of a monitor, is through spectrometric analysis.
    Music, no matter its tones, is always different.
    Therefore, you should try out all the music in the world to have an accurate test of a monitor quality.

    …or

    send it a signal with every possible frequency (white/pink noise), and analyse the resulting sound with a high fidelity microphone (measurement microphone).

    In technical language: a spectrometric analysis.

    The result of this analysis is going to be a frequency response.
    Which is exactly what we have written about previously (5).

If you want to know why this tutorial was made, you’ll find out more in this post:

Our first post.

And you got our entire website to hear if we’re talking about something that we can do.

We want to hear about you!

If you have found this post to be useful, share with us your experiences on our socials!

Maybe you could also add a link of what you’ve created, and by using the hashtag #lmkmprod we’ll be able to find all of you.

We’re looking forward to hearing from you!

11 rules to buy the right audio gear

Smart advice to buy the right tools for your passion.


With the right gear, half of the job is already done.

So, we’ve collected some good advice to give you a good mindset for choosing the right tools to realize your ideas.

  • Hou much do you love music?

    Are you going to try to make it for a living? Or it’s just a free time passion?

    • In the first case, you must choose your tools very wisely, and don’t be concerned to spend a lot. Preferably after consulting a reliable audio professional or building yourself a flawless knowledge about this job (which means both practical aspect and market analysis): if you make the right choices, you’ll have your money back from your happy customers.
    • In the second one: don’t bother too much. You don’t have any market to being fit within: just enjoy the trip.
  • Are you going to have customers?

    Because, if you’re going to, you must create something that will sound good even on other rooms, on other sound systems and that will satisfy even other people. Many times, other people who have listened to a lot of good music in very nice sound systems, and that they won’t care if you’re just a beginner.

    In other terms: you must respect professional production standards, both artistic and technical.

  • Have you the right place for what you’re going to buy?

    Drums and guitar amplifiers are loud, audio monitors needs acoustically treated rooms, real pianos are bulky…

    Keep always extreme attention to where are you going to use your gear: the wrong place can nullify the right gear.
    If you have an awesome pair of 8″ audio monitors in a 2x3mt room, they will be completely useless because of acoustic reasons.
    Same thing for a cheap microphone who can sound good in studio, but it will crack like hell in a live environment with a lot of humidity.

    Don’t be egocentric or short sighted, or you won’t enjoy your new gear.

  • Don’t think first about how to do it: think first about what you want to do.

    You’re buying an instrument: you’re buying something that will only be a way to obtain a goal.
    It’s within its meaning: “instrument”. Not “purpose”.

    Don’t focus too much on the instrument.
    In fact, it’s better to don’t even think about your instrument: focus only on what you must realize.

    Think about your instrument only if you’re absolutely sure that your skills are completely covering any field that you’re dealing with, and you still don’t have success.

  • They‘re only instruments: they won’t play for you.

    Don’t buy anything with the mindset “it will do the job”: -you- are going to do the job, with the aid of an instrument.

    If you don’t have a clear idea of how to get done something, you don’t need a new instrument: you need to be more skilled.

  • And, even if they somehow can, it won’t have any sense.

    Art is expression.
    What makes it so special and beautiful is the variety in it. The fact that we put our soul in our art.

    What’s the point in just clicking a button? You’re not making art: you’re playing a button, and listening to something done by others. You’re not being yourself: you’re being a surrogate of someone else.

    Are you sure that you want to spend your time being a surrogate of someone else?

  • Don’t use only your ears: use even your brain. (A little introduction to psychoacoustics)

    We don’t have spectrometers and hard disks: we have ears and a soul.
    We’re not machines that memorizes data: we are humans that remember emotions.

    We don’t memorize data: we memorize feelings. Not “110db, 80Hz”: “a loud low tone”.
    Which is the reason because we can make art: we have feelings.

    And even because we can say that we’re alive.

    …and even because we are not incline to memorize precise data, like acoustic characteristics or frequency responses.

    For example, in your early years of mixing, it will be quite common to being extremely happy for your last mix only to find out, on the next day, that it sucked really hard.
    It’s absolutely normal.
    You will get rid of this with years of good practice and study.
    It’s the difference between being a pro or not.

  • DON‘T LISTEN TO TESTIMONIALS (...unless you’re long term friends)

    They have plenty of production money: they can afford to buy something only for its aesthetic purpose (what do you think the purpose of a Marshall amplifiers wall is?), and they have plenty of audio professionals ready to correct any sort of trouble due to this “choreographic” modus operandi.

    And, more important: they don’t care about you. They’re paid to advertise. They won’t go broke if you can’t make the music that you wanted to.
    And you won’t know what tools they are effectively using until the day that you will work together with them.

  • DON‘T LISTEN TO FRIENDS/PARENTS (...unless they’re well established audio professionals)

    The fact that you spent a lot of nice days together doesn’t mean that they’re trained audio professionals.

    There’s nothing wrong about it: music isn’t a joke. It’s serious business.
    Your passion is a serious business. And it must be dealt only by skilled professionals.

  • Don‘t listen to anyone that doesn’t give you strong theoretical facts.

    The faster way to understand if it’s a good advice it’s pretty simple: ask why.
    If you’re doing this because you want it to be your job, don’t accept anything pre cooked: always ask “why”. And don’t accept “because it’s good”: ask for a plausible scientific explanation.

    Because, with tools, we aren’t talking about magic: there is always a strong scientific background for any audio tool.
    A frequency response plot and a polar pattern for a microphone, for example: is this microphone as good as they said? Well: let’s see the charts. Show me.

  • But never forget that you‘re not doing math: you’re doing art.

    Scientific knowledge about your instruments is only a way to find a clearer path to know how to realize your ideas. It’s not a “bigger number competition”.

    A perfect instrument for situation A could be the worst choice for the situation B: it’s art. It’s all about the context.
    It’s all about what do you want to create.
    Never forget it.

If you want to know why this tutorial was made, you’ll find out more in this post:

Our first post.

And you got our entire website to hear if we’re talking about something that we can do.

We want to hear about you!

If you have found this post to be useful, share with us your experiences on our socials!

Maybe you could also add a link of what you’ve created, and by using the hashtag #lmkmprod we’ll be able to find all of you.

We’re looking forward to hearing from you!