10 minutes to properly place your studio monitors.
In this tutorial we’re going to give you 9 simple tips to accurately place your studio monitors.
This is a tutorial for near field monitors.
Premise: you’re going to need a 2 meters long rope/wire, a laser level and a microphone stand.
Any laser level will do the job: you can one for little money in any tool shop.
Like this one, for example.

www.bricoman.it
The more of these features it has, the better your studio will be
- Thick walls
- Walls composed of dense material
- Uneven walls (for example, natural stone ones)
- No bare walls (wardrobes, bookshelves, armchairs, couches)
- No bare corners (corners are, from an acoustic point of view, quite peculiar)
- Far from bedrooms / highly populated areas
- Far from noisy public transport systems (underground, tram, train, rocket launch base…)
- No noisy neighbors
- Dry
- Not excessively high or low temperatures
You should favour a workbench that’s solid and full (that is, without room for legs): they have a better acoustic output.
Place its rear close to the widest wall, leaving 30-40 cm of empty space between the bench and the wall itself.
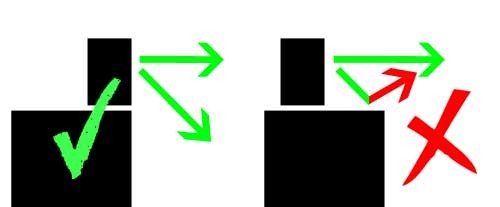
Anything you put below the monitors is going to create reflections. And reflectioins alter the audio signal.
Try to keep the space in front of the monitors as clear as possible, but there’s no need to overdo: a keyboard, for example, is not going to cause any harm.
And yes, you got it right: placing the speakers behind a huge mixer with a gazillion of faders is not a good idea.
Try to put a notebook below your chin while you’re speaking, and listen to the difference. And remember that the human voice has much less frequencies than an audio signal.

Correct monitor position.
High pitched sounds are extremely directional: to hear them well you need to point them exactly at your ear height.
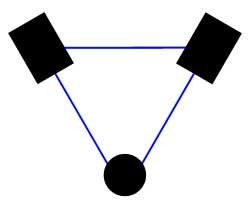
Place the speakers so that they create, more or less, an equilateral triangle with your head as one of the vertexes.
A rapid method is to use your arms as guides: open them out so as to form an equilateral triangle, having the speakers in front of the palm of your hands.
Vertically extend the microphone stand, and place it where your head is going to be.
Take the wire, measure the distance between the stand and the tweeter and, holding your finger on the rope marking the measured distance, use it to equate the distance between these points:
- Tweeter 1 – Tweeter 2
- Tweeter 1 – Stand
- Tweeter 2 – Stand
This way, you will obtain a perfect equilateral triangle.
Like the one in this picture.

Properly placed studio monitors.
Place the laser level upon the monitor, exactly above the tweeter, turn the speaker until the tweeter is aligned with the microphone stand.
Of course, don’t move around neither the stand nor the monitors: turn the speakers so that their tweeters are pointing towards the stand.
Pop a bottle of champagne, turn up the volume, and play Lateralus by Tool in your now perfectly positioned system.
At this point, your system is going to be flawlessly positioned.
In other tutorials we will explain how to acoustically prepare the room in which you placed your speakers and how to solve possible sound problems that may ruin the reliability of your audio monitors.
If you want to know why this tutorial was made, you’ll find out more in this post:
Our first post.
And you got our entire website to hear if we’re talking about something that we can do.
If you found this post useful, please: share your experience with us on our social pages!
Maybe together with a link to what you’ve created, and using our official hashtag #lmkmprod to let us find you all.
We’re looking forward to hear about you!


